Today I had the quick task of converting an old, internally-hosted Mercurial repository to Git - and subsequently pushing the converted repository to GitHub.
It was a lot easier than I thought it would be! Hopefully this should help others as it appears there are a number of ways to do this.
The Conversion
First of all, clone the repository you wish to convert.
$ hg clone http://mercurial/old-repository
Now create a directory with the name of your project in a separate location.
$ mkdir converted-project
$ cd converted-project
Next, we need to clone the Mercurial-Git converter into the directory we just created (‘converted-project’).
$ git clone git@github.com:frej/fast-export.git .
Once that’s done, we should remove the existing Git references in our directory before re-initialising it.
We’re ready to do the actual conversion now. We simply point the bash script hg-fast-import.sh to our Mercurial repository that requires converting with the -r flag. You should see some lengthy output from the conversion.
We just need to push the converted repository to GitHub now. From the conversion there should only be a master branch (you can check this by running git branch -a).
$ git push origin master
Counting objects: 8561, done.
Delta compression using up to 4 threads.
Compressing objects: 100% (3345/3345), done.
Writing objects: 100% (8561/8561), 38.26 MiB | 677 KiB/s, done.
Total 8561 (delta 5040), reused 8561 (delta 5040)
To git@github.com:organisation/project.git
*[new branch] master -> master
As a long-term(ish) user of Java but a recent adopter of Ruby and Cucumber, I’ve been aware of Cucumber-JVM – a rewrite of Cucumber in Java for the uninitiated – for some time now.
But first, some background. I reacquainted myself – and got more serious with – Java a couple of years ago (after allowing myself to get far too rusty with it after my degree finished). Getting certified re-taught me a lot of the fundamentals as well as properly uncovering the deep, dark depths of the language for the first time. At the time I was using Java with the most popular BDD framework at the time - JBehave.
With hindsight, JBehave was unwieldy, unfriendly and simply tried to do too much. I didn’t realise this at the time as verbosity and unwieldiness are often part-and-parcel of Java (and other similar languages e.g. C#). This isn’t a criticism of the language itself – it’s just how it is.
Eventually, I moved on to another company where I was exclusively using Ruby and Cucumber for the first time. Initially it was a struggle but now I fully appreciate just how powerful and flexible the language is and how strongly I identify with Ruby’s mantra and raison d’être.
Which brings us to the whole point of this post.
Ruby and Cucumber
What I love about Ruby and Cucumber is that the simplicity of each perfectly compliments the other.
My personal transition from Java to Ruby has given me food for thought. In the same way that I learnt from my own journey, perhaps Java also can learn from the leanness of Cucumber?
Java vs. Ruby
I decided to put the idea into practise.
Today I looked at implementing a basic example from the ITV back-end test suite in Java and Cucumber-JVM. Take a look on my GitHub account for the complete example.
It’s difficult to directly compare the two implementations as they do differ very slightly in their aim and use of helper methods but you cannot deny how similar the two snippets look:
Java:
@Given("^I request the (\\w+) Most Watched Feed for (\\w+)$")publicvoidI_request_the_type_Most_Watched_Feed_for_platform(Stringtype,Stringplatform)throwsThrowable{mercuryRequest=newMercuryRequest();response=mercuryRequest.requestMostWatchedFeed(type,platform);}@Then("^I get a successful (\\w+) response with the correct (\\w+)$")publicvoidI_get_a_successful_type_response_with_the_correct_platform(Stringtype,Stringplatform)throwsThrowable{Stringtext;switch(RequestType.valueOf(type.toUpperCase())){caseJSON:JSONObjectjson=mercuryRequest.stringToJson(response);text=JsonPath.read(json,"$.Parameters.Platform");assertEquals(platform,text);break;caseXML:Documentxml=mercuryRequest.stringToXml(response);XPathFactoryxpf=XPathFactory.newInstance();XPathxpath=xpf.newXPath();text=xpath.evaluate("//Params/Param[2]/Value",xml.getDocumentElement());assertEquals(platform,text);break;}}
Ruby:
Given/^I request the (\w+) (\w+) (.*) api$/do|type,platform,uri|@uri="#{EnvConfig['mercury_url']}/api/#{type}/#{platform}/#{uri}"@response=@mercury_api.get_response_from_url@uriendThen/^I get a successful (\w+) response with the correct (\w+)$/do|type,platform|casetypewhen'xml'xml=@mercury_api.get_xml_from_response@responseunless@mercury_api.value_exists_in_xml_node?(xml,"Value",platform)raise"could not find the correct platform value: #{platform} in the response for uri: #@uri"endwhen'json'json=@mercury_api.parse_json_response@response@mercury_api.find_value_in_hash("Platform",json).should==platformendend
Looking Ahead - The Killer Questions
I’m not trying to draw any concrete conclusions but I think the next year or two could be an interesting time for BDD development with regard to Java and Ruby (and possibly other languages).
Will Java learn from Cucumber (and Ruby’s) example in terms of verbosity, clarity and maintainability?
Will the emergence of Cucumber-JVM together with the open-source movement encourage developers/testers to focus more
strongly on a common language – particularly in light of Ruby’s comparatively poor performance for enterprise applications versus Java?
Will Ruby truly be able to throw off the performance shackles it wears with the release of Ruby 2.0 and become more than a niche startup, prototyping and test automation language?
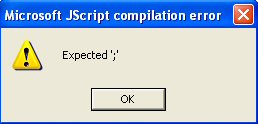
In my Jenkins distributed build system I have a Windows slave that’s started via the recommended Java Web Start (JNLP).
Every time I restarted the Jenkins master or the Windows slave (i.e. broke the master/slave connection) I would get a couple of Microsoft JScript compilation errors:
This is a problem because the Jenkins slave will not connect until the errors are dismissed. Obviously this is a major problem in a headless environment.
A similar bug was raised here: http://issues.hudson-ci.org/browse/HUDSON-7819 but no resolution was given.
The quick fix
After annoying me for a while I finally managed to suppress the errors.
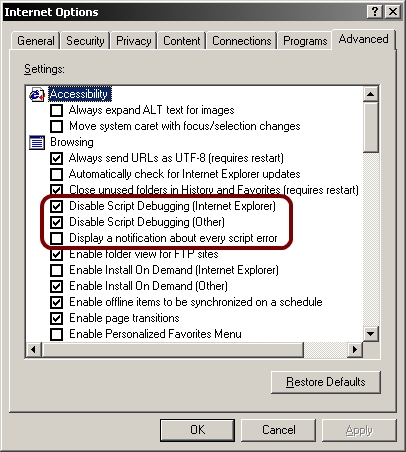
To make the errors go away, go to Control Panel > Internet Options > Advanced tab > then click the two ‘disable script debugging’ checkboxes and untick ‘display a notification about every script error’:
The long-term solution
Instead of using JNLP I’d recommend master-slave communication using SSH.
This can be slightly tricky to set up using Windows (requires Cygwin and an SSH server), but there are plenty of guides out there.
Another quick post from something that I worked on today.
I needed to create a Bundler-esque solution for a non-Ruby project. Often, such pragmatic decisions do not offer the cleanest approach but I required a fairly robust long-term solution.
Introduction
To give some context, I am currently migrating many year’s worth of builds from TeamCity to Jenkins. I’m not going to go into details of why I recommend Jenkins but it’s been one of my favourite tools for a long time (and Hudson before that).
A set of jobs that I’m migrating are non-Ruby but utilise a bespoke Ruby gem via a Rakefile. The problem is that a large number of jobs have a dependency on this gem but as they are not Ruby projects there are no gemspecs, hence no Bundler support.
Possible Approaches
I think there are two main approaches here:
Introduce Bundler support (i.e. gemspecs) for each project.
Introduce a more defensive approach as a pre-build step in Jenkins.
The first approach is difficult due to the large number of projects across various source control systems (Git, Mercurial). Furthermore, the front-end developers who the projects belong to would prefer not to be burdened with extra local build steps (i.e. complexity with a tool outside of their core skills).
Therefore the second approach was necessary. I had a few requirements:
Builds had to be fast and reliable in my distributed Jenkins build system.
The builds had to work on any *nix master or slave, installing any required dependencies itself.
Implementing a solution
So I began with a simple Ruby class that lives at the root directory of the bespoke gem. First, I needed to know the current version directly from the gem source.
Where Bloomfedtasks is the name of my Ruby gem (and therefore the Ruby gem module).
I then needed an easy way to figure out what version of the gem was currently installed on the system (if at all). I wasn’t previously aware of the wealth of possible RubyGems commands there were but I easily found what I was looking for. I tested the command in a terminal window first:
Great - all I needed now was a regular expression to capture the version and return it if found, otherwise return 0.0.0 (in other words, not installed).
And that’s it. The complete class looks like this:
classGemVersionrequire_relative'lib/bloomfedtasks/version'class<<selfdefget_source_gem_versionBloomfedtasks.const_get(:VERSION).to_senddefget_installed_gem_versionversion=(`gem query --name-matches bloomfedtasks`.match/(\d+\.\d+\.\d+|\d+\.\d+)/).to_sversion==''?'0.0.0':versionenddefupdate?get_source_gem_version>get_installed_gem_version?true:falseendend# true if it needs updatingputsupdate?end
Going further with a shell script
The code above is useful in so far that it tells you if your installed version of the gem is the latest. It still requires you to acknowledge that your gem is out of date before needing you to manually build and install it. A simple bash script can do this for you:
#!/bin/bashif[`ruby gem_version.rb`=true]; then
echo"Your bloomfedtasks gem needs updating. Installing now..."
gem build bloomfedtasks.gemspec
gem install bloomfedtasks
else
echo"Your bloomfedtasks gem is up to date."fi
It simply executes the Ruby script we wrote earlier and builds and installs the gem if it is out of date.
Conclusion
It was interesting to see how easy this was to put together. It has also sped up a large number of Jenkins builds by ~80% which is nice to see. Of course the biggest pitfall is forgetting to update the gem after making a change…but I’m willing to take that risk as it is not widely used or business critical.
Here’s how you can highlight elements in the browser using Selenium WebDriver with Java.
If you want to skip ahead, I’ve got a working example in a GitHub repo that uses JBehave as the test runner. This
way, you can build the project yourself, see a “real-life” example and tinker with it.
I’d like to thank Iain for his blog post on highlighting elements.
Getting Started
First of all – if you are building an automation framework at your organisation – it’s sometimes a good idea to wrap certain WebDriver calls through a bespoke, lightweight common library.
It helps enforce standards inside your organisation.
It can reduce code.
It increases code readability.
Particularly difficult things to automate (e.g. hover and click, drag and drop) can be used again and again by
different project teams.
A solid common library makes tests more stable as it is harder to introduce silly errors into your code.
It is much much easier to update common methods with the latest API additions and best practise.
We need two methods to achieve our aim.
First, we need to create a setAttribute() method similar to the WebDriver getAttribute() method. The WebDriver API
does not have this built in because it is specifically designed to mimic the user’s interactions with the browser – and the user cannot change attribute values (through “normal” use).
The definition of this method depends on your setup. You need to cast your WebDriver instance to JavaScriptExecutor for it to work.
If you use JBehave like I do then WebDriverPage casts the WebDriver
instance to JavaScriptExecutor for you already. Like so:
So we can call executeScript() directly in our method without worrying about casting it first.
/**
* Set an attribute in the HTML of a page.
*
* @param element
* The WebElement to modify
* @param attributeName
* The attribute to modify
* @param value
* The value to set
*/privatevoidsetAttribute(WebElementelement,StringattributeName,Stringvalue){executeScript("arguments[0].setAttribute(arguments[1], arguments[2])",element,attributeName,value);}
If you don’t use JBehave then this should do the trick:
/**
* Set an attribute in the HTML of a page.
*
* @param driver
* The WebDriver you are using
* @param element
* The WebElement to modify
* @param attributeName
* The attribute to modify
* @param value
* The value to set
*/privatevoidsetAttribute(WebDriverdriver,WebElementelement,StringattributeName,Stringvalue){JavascriptExecutorjs=(JavascriptExecutor)driver;js.executeScript("arguments[0].setAttribute(arguments[1], arguments[2])",element,attributeName,value);}
Now we just need to create a highlight method that uses setAttribute().
/**
* Highlight an element in the UI.
*
* @param element
* The WebElement to highlight
*/privatevoidhighlight(WebElementelement){finalintwait=75;StringoriginalStyle=element.getAttribute("style");try{setAttribute(element,"style","color: yellow; border: 5px solid yellow; background-color: black;");Thread.sleep(wait);setAttribute(element,"style","color: black; border: 5px solid black; background-color: yellow;");Thread.sleep(wait);setAttribute(element,"style","color: yellow; border: 5px solid yellow; background-color: black;");Thread.sleep(wait);setAttribute(element,"style","color: black; border: 5px solid black; background-color: yellow;");Thread.sleep(wait);setAttribute(element,"style",originalStyle);}catch(InterruptedExceptione){e.printStackTrace();}}
It’s not the prettiest code but the effect is pretty cool.
You could parametrise the colours if you wanted to. I also feel that the wait time is enough to clearly notice what’s going on without slowing tests down too much.
Using it in your code.
I have a working example in a GitHub repository. You just need Maven and Firefox installed.
Simply follow the running instructions to see the highlight method in action while searching for things on Amazon.